
“My Favorite Drill”
“My Favorite Drill”
By Bob Cunningham
Nov 5, 2001, 19:21
 |
| The rim-it drill |
Back and forth, to and fro, up and back. The Los Angeles Kings are near the end of practice, so it’s time for hockey’s equivalent of wind sprints. Players become a blur as they skate speedily — first to their own blue line and back to the goal, then to center ice and back, then to the opposite blue line and back…then aaaalllll the way to the opposite goal and back.
Whew!
Wait a minute. An NHL player’s life is always glorious, right? If they’re not cruising down the ice, arms raised after yet another impressive goal, or filming an ESPN promo, they’re pulling away from the arena in a Porsche 944. Right? Ah, to have it so rough.
Twweeeeett!
Not so fast, all-stars in the making. In order to become the best of the best, every NHL coach and most NHL players realize that there can never be too much practice. There’s always room for improvement, even on the basics of the game.
So, with that in mind, Hockey Player decided to speak with a few coaches about their favorite drills. The following four routines were mapped out for us by coaches in Anaheim, Vancouver and Calgary. You’ll see that no player goes un-tested. Goaltenders are spun every which way, and pucks come at skaters from every conceivable direction — not necessarily one at a time.
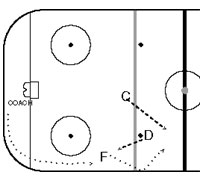
Play-it-or-Set-it
 |
| Play-it-or-set-it |
Communication,” says Hislop, “is absolutely vital. Miscommunication usually translates into turnovers.” Hislop has another routine that focuses on decision-making, but actually puts a higher priority on communication:
With a goalie in position and a player out on the wing in his own end, a coach at center ice begins clearing pucks into the zone around the boards. With quickness and certainty, the defenseman must communicate to the goaltender whether he should “Play it” — by sending the puck out to a teammate or slapping it along one of the wings — or “Set it” — which simply means stop the puck, and leave it behind the net for a teammate to take control of. l
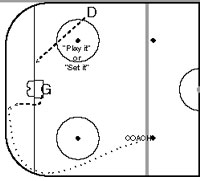
Goaltender Assault
 |
| Goaltender assault |
The ultimate durability test for a goaltender is relayed by Vancouver assistant coach Glen Hanlon. By the time the drill is completed — after about 10 minutes — a goalie will have been tested from sharp angles, with stiff slap shots and by net stuffers. The object is basic enough.
“Don’t allow goals,” says Hanlon. “Anticipate, take away chances, or at least minimize the opposing shooter’s chance for success.”
With a coach and his trusty bucket of pucks positioned at the center of the blue line, a forward rotates to different spots around the goal (X1 to X2 to X3, etc.). Upon arriving at each spot, the coach simply passes to the forward who controls the pass, turns, and shoots. The action is non-stop.
“The shooter is not trying to blast it every time. We want the drill to be fast-paced, so you have to ease off somewhat to give the goalie a realistic chance to make the save and position himself for the next shot,” Hanlon explains. After several shots from one spot, the forward moves to another position and the drill continues.
An added dimension comes when another forward (F1) positioned behind the net and to the side, passes to another forward on the flank rather than attempting to move into position for his own shot (not shown). In this instance, the goaltender must play the first forward as if he will try a stuff, and then slide quickly across the crease in time to answer the second forward’s shot.
In all, six different pass-and-shoot scenarios are played out, three on each side. “Sometimes a coach can watch how the goaltender plays certain shots and help him work on improving those areas,” says Hanlon. “Even though it’s a basic drill, we use it all year. Actually, that’s why — because it’s so basic.”
Players and coaches alike agree that the best “drills” are live game action, or at the very least, an organized scrimmage.
“Situations crop up all the time during games that are hard to duplicate in practice.” Army says. “But we have a pretty good idea of what areas need the most work.”
And often winning can dictated by that basic…practice.
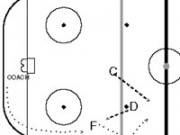
The Rim-it Drill
The Calgary Flames tend to do most things briskly, so the following drill explained to us by Flames assistant coach Jamie Hislop is certainly relevant.
The exercise is basic, but goes to the ever-present requirement in hockey to make accurate snap decisions.
A player lines up as a forward, alongside his center. An opposing defender is present. A coach, with dozens of pucks at the ready, is stationed behind the net. He begins firing pucks around the boards. or “rimming it,” up the ice to the wing (F). It’s the forward’s job to either; 1) get the puck to the center in a safe and timely manner without allowing the defenseman to gain possession, or 2) skate the puck up the ice himself.
The most common maneuver for the wing is to slap the puck behind him off the boards, intending the rebound to reach the center before he crosses center ice (as shown in diagram). But the defenseman in the drill is instructed to do different things. Sometimes, he will play the wing tight, forcing him to pass immediately. Other times, he will back off and try to intercept a poorly-conceived pass through the middle.
“The player has to know where everyone around him is — his teammates and the opposition,” says Hislop. “If it’s done right, you can get some man advantages out of it down the ice. But you can also end up turning the puck over in your own zone, which in this league usually ends up in a goal scored against you.”
The criss-cross,
4-way play
Mighty Ducks of Anaheim Assistant Coach Tim Army explains his favorite drill this way.
“The idea is to pass to, and takes passes from, several different angles within a short period of time. It’s a drill for making quick, clean passes and finding the open man quickly. It’s basic, but we’ve found it to be useful.”
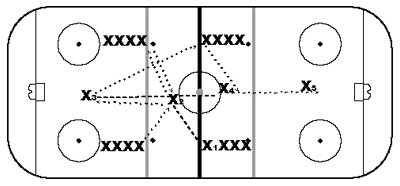 |
| The criss cross, 4-way play |
Starting with the lower right line of players (X1), a player skates a few feet diagonally and receives a pass from the lower left line (X2), then fires a pass to the opposite corner. He then takes a pass from that same corner and skates to the left, across the blue line between the two lines of players (X3) and fires a pass to the first player in the upper right (opposite angle from where he’s now positioned). The player then races through center ice, (to the right) takes a pass from upper right (X4), moves in toward the goalie, and fires a shot (X5). Each player rotates to the next line in a counterclockwise fashion.
“The ability to see the ice and pick out things while in traffic is important,” Army says. “That’s the main thinking behind this drill.” l
This first appeared in the 06/1994 issue of Hockey Player Magazine®
© Copyright 1991-2001 Hockey Player® and Hockey Player Magazine®
