Home » Drills » Recent Articles:

2 on 1 Breakout

August 24, 2011 Drills, Hockey Blogs No Comments

Drill:

1. On whistle, the Forwards in the each corner skate for the opposite dot, turn and cut back in the middle. Defense starts to skate backward out of the zone.
2. Goalie (or a Coach) looks to make an outlet pass to one of the players after they turn the dot
3. 2 Forwards now work out of the zone and Defense works to control their movement

Focus:
1. Lateral movement by the Forwards to get open
2. Puck movement by the Goalie. Goalie should focus on passes out toward the circles and not in the middle

Notes:
This drill is move for skating and lateral movement and is not recommended as a breakout option. Skating back and forth is wasted movement and moving the puck in front of the net is never a good thing.  What I’m trying to teach them is the side to side movement to get open.  Most young players want to head straight up the rink.

Related Drills:
3 on 2 breakout
Behind net breakout

Skate 8 and Deflect

August 19, 2011 Drills, Hockey Blogs No Comments

Drill:

1. Line 3 Defenseman up at the points (D location is based on skill level of players and how far they can shoot.
2. Forward passes puck to point man and skates around first circle and then stops in front of net looking for a deflection from the D shooting from the top of the circle he just skated around.
3. Forward now skates toward the corner, picks up a puck and passes it to the point man. He continues around the circle to the front of the net again looking for a deflection
4. Last he moves toward the middle of the net looking for a deflection from the last Defenseman.

Focus:
1. Puck movement to the Point man.
2. Getting to the front of the net and looking for deflections/rebounds.

Notes:
I found a variation of this drill on another site and will give credit if I can locate it again.

Related Drills:
Drop and go
Skate and tip

Skate, Stop and Pass

August 16, 2011 Drills, Hockey Blogs No Comments

Drill:

1. Put players in groups of 2 starting at the goal line
2. Player 1 skates 4 strides, stops and looks for a pass from Player 2
3. Player 2 passes back to Player 2, then skates stops and looks for a pass
4. Continue this to the Blue line
5. Repeat all the way back to the goal line
6. Player 1 & 2 Switch positions and repeat drill

Focus:
1. Good quick starts
2. Good Stops and head up looking for a pass
3. Good passes back to their teammate

Notes:
A lot of variations on this drill by changing up the number of strides or placing markers where they need to stop.

Related Drills:
Passing Forward/backward Tandems
Give and Go

Cardio Training: Good News & Bad News

March 16, 2011 Drills No Comments

Two days ago we sent you a link to the first video of a 3 part series on off-ice training for hockey. The topic was periodization for hockey; a weightlifting technique that helps keep strength gains consistent, and let’s you avoid plateaus. The video was a huge hit, and we’ve had a lot of very positive feedback about it!

Let’s start with the bad news…

The bad news is, the 1st video has been taken down, and replaced with the 2nd video in the series, which is all about Cardio Training for Hockey. The information contained in this video will show you how to TRAIN your body to be able to skate HARDER, and FASTER, for LONGER, then RECOVER MORE QUICKLY after doing so.
You can check out the video here:

HockeyDevelopmentSystems.com

Now here’s the good news…

The good news is you can still catch the first video, even if you missed it the first time around! Jeremy has made the first video available, all you need to do is enter your email address at the link below, and he’ll send the video straight to your inbox!

HockeyDevelopmentSystems.com

We have a lot of confidence in Jeremy’s techniques. We recommend that all looking to be step ahead
next season look into this develop system.

Passing, shooting and skating drill

March 15, 2011 Drills No Comments

By Hockey Player Staff
Oct 23, 2001, 15:04


With one player each at Positions 2 and 3 (both just inside the blueline) and 4, the rest of the team starts at Position 1. The dashed line represents puck movement, while the solid line represents player movement.This drill is a great all-around tool because it combines all major aspects of the offensive game: passing, skating and shooting. After the goalie has been warmed up, run this drill before moving on to more complicated ones.

Station 1

The player at Station 1 starts the drill by making a quick, brisk pass to Station 2. Immediately after making the pass, Player 1 quickly skates up along the boards and around the blue line face-off dot (and the Station 2 player), then streaks directly toward the net, anticipating a pass (from Station 4) upon entering the slot. The player tries to score from the slot, and then moves on to become the new player at Station 4.

Station 2

This is actually the last station of the drill. After receiving the pass from Station 1, this player makes a quick pass to Station 2, waits for Player 1 to skate around him, and then skates to the back of the Station 1 line, picking up a stray/unused puck along the way.

Station 3

Upon receiving the pass from the Station 2 player, Station 3 makes a quick pass to Station 4 and drives along the blue line to the other side of the rink to become the new player at Station 2 for a new cycle of the drill.

Station 4

After receiving the pass from Station 3, this player makes a pass to Player 1, who by this time is streaking into the slot, ready for a pass. Upon making the pass to Player 1 in the slot, this player skates briskly up the boards to become the new player at Station 3. By this time a new cycle of the drill is underway.

Points to remember

• This is quick drill; cycle two can begin before Player 1 has taken a shot.

• Passing should be quick and brisk.

• Skating should emphasize swift starts and stops.

This first appeared in the 03/1995 issue of Hockey Player Magazine®
© Copyright 1991-2001 Hockey Player® and Hockey Player Magazine®

The 1995 “lockout sessions”

March 7, 2011 Drills No Comments

By Robby Glantz

Rick Tocchet as a King. ©BBS

The owners’ lockout in the NHL this season has, of course, been unfortunate for all fans of the sport. During this down period most of the players have been attempting to stay in shape or improve aspects of their game on their own. As the Power Skating Coach for the Los Angeles Kings, I have been working with numerous players on the team on both Overspeed and Technique training nearly every day since the lockout began. It is a great credit to these players, many of them NHL stars, that they have worked so hard with me to improve a part of their game that the average fan might think is already second nature to them.

I want to share with you some of the techniques and drills that we have been using with players such as Tony Granato, Rick Tocchet, John Druce, Michel Petit, Charlie Huddy and others during this difficult lockout period.

Speed training

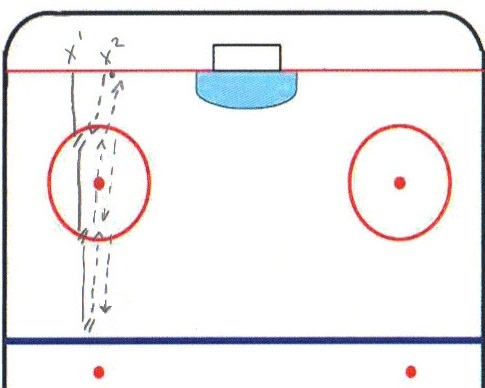
Naturally, all of the players with whom I have worked want to stay in game shape, first and foremost. And playing pickup hockey, while fun, will simply not get the job done. The first half of our hour-long training sessions have been spent on speed training, with drills used to simulate game conditions. We concentrate on short explosive exercises (13-to-17 seconds each) with much emphasis placed on coming out of the turns at top speeds—even if that means falling down. I then give the players a recovery period of about 35-50 seconds before they repeat the same drill at top speed.

I have players repeat the same exercise with the exact recovery time two more times, but going the other direction. Note that as you become more advanced and begin to recover your wind sooner, you should then add puck carrying to make the drills more challenging.

Always attempt to make your drills as innovative as possible. As a rule of thumb, I like to put at least two turns or stops into every exercise. Also, I prefer to have the players skating their long sprints close to the boards because it gives them an idea just how low they are skating. If their head, for example, is way above the top of the boards then they know they need to bend their knees more. This is perhaps the most vital element of speed training, that you bend your knees much deeper than what is normal to you, which is referred to as coming out of your “comfort zone.”

Strength and technique training

The second half of the session is spent on resistance drills and training devices in order to really build the muscles in the lower half of the body, and also so that the players have to slow down and think more about their skating techniques. Tocchet thoroughly enjoyed this aspect of the training because it helped him to feel specifically where he needed to improve his own skating. He called it “muscle memory,” which is an excellent way of putting it and one of the main reasons I use training devices in my schools. It helps strengthen the muscles, and helps our students remember and feel both the positives and negatives in their skating.

Tools of the trade

One of the training devices I use is made by Greater Performance Inc., and is simply a stomach pad that goes around the top of your pants with two leashes hooked to your hips so that a player behind you drags, giving you resistance while you skate. I then use the same technique drills while using the stomach pad that I use when the player is not getting any resistance at all. That is one of the aspects that makes this simple device, which I use at all of my schools, very effective; you can skate as you would in a games (even with the puck) while still getting the technique training that is so vital. They are also a lot of fun!

Another of the training aides I use is the Leg Harness made by Improve Human Performance. It is especially effective on pro, adult and elite players (over the age of 14). Quite simply, the Leg Harness, which is designed for on-ice, in-line and slide board training, is a series of bungee cords running down the inside and outside of your legs, which force you to bend your knees to the optimal position while strengthening the groups of muscles needed for skating efficiency. This device has been quite popular with Huddy, Petit, Druce, Troy Crowder and others, as it not only gives them an unbelievable workout (perhaps the equivalent of an hour workout in just twenty minutes time), it also accentuates the mistakes made in skating, thus improving on their technique.

Robby Glantz, power skating coach for the Los Angeles Kings, Swedish champions Malmö, and the German National Teams, conducts skating programs throughout North America and Europe.

This first appeared in the 02/1995 issue of Hockey Player Magazine®
© Copyright 1991-2011 Hockey Player® and Hockey Player Magazine®

Creating explosive starts

February 27, 2011 Drills No Comments

By Robby Glantz

Fast starts are vitally important in ice hockey. Whenever I work with pro players—from the LA Kings to National Team players in Europe—the skating skill that they like to work on the most is, inevitably, the explosive start. And this holds true whether they are defensemen or forwards. They like to work on bettering their starts because they realize that with the proper techniques and training they can improve their overall quickness.

Getting an explosive start can be just as important in hockey as one’s straight-ahead speed, since hockey is a sport of short bursts and change of directions. This month’s article will introduce you to, and focus on the techniques for front forward starts that should help you “get the lead out” of your skates.

Forward Starts

Techniques

Make sure you start with your skates directly under your body, forming the letter “V”—with your heels together and knees turned outward. It is very important that you maintain this narrow base throughout the start.

Bend the knees to 90°. Then thrust your body forward by applying 100% of your body weight to the front part of the pushing foot’s inside edge (the toe of the skate). You should land on the front part of the other skate’s inside edge, and then repeat the move again.

To gain that quick off-the-mark start, take your initial three strides as described above, with the push coming from the toe part of the inside edge of your skate blade. This will give you that explosive running motion that you often see from quickest players in the NHL, like Wayne Gretzky and Sergei Federov.

Helpful Hints

To gain an explosive start, you should picture in your mind what a sprinter looks like when the gun goes off. The sprinter is trying to thrust forward—not upward—to gain that extra advantage at the start, and their initial strides come from the balls of the feet. It is extremely similar in hockey. We want to feel like we are thrusting forward; taking quick strides that may look like short strides to the naked eye but are, in fact, best performed when fully extending the pushing leg. Remember to stay low throughout the move, trying to cover as much distance as you can while still making very rapid strides.

Drill

The ability to get up on the toes of your skates is the first step in improving your start, and an excellent drill to improve this skill is one I call “The Penguin,” or the “Charlie Chaplin.” To start the exercise, place your feet in the “V” position, bending your knees deeply and turning them outward. Then attempt to lift your heels off the ice so that you are standing only on the toes of your inside edges. Once you get the proper balance, begin to walk slowly across the ice while only on the toes of your skates (like a penguin, or Chaplin). If you can stay only on the inside edge of the toe for at least four strides while walking slowly, that would be an excellent result—and that ability will help you to get on your toes for more dynamic starts in game situations.

Once you feel confident walking on your toes, add some speed to the drill. Begin by walking slowly on the toes of your inside edges, like Chaplin again, for about five strides, then attempt to build up speed with the next three-to-four strides—doing the same drill, but now at game speed. You should really begin to feel the explosive start. Remember to exaggerate all these movements in practice so that in the games you do not have to think about them.

Be patient

If you read this column regularly, you then know that we urge you not to got discouraged or lose your confidence if you have trouble applying some of the techniques we describe. This is doubly important when practicing the explosive start. I have pro players who return to me frequently to work specifically on their starts, and getting up on the toes of the skates is extremely difficult even for these highly skilled players.

So be patient, and do not be afraid to fall down or make mistakes. As is so often the case when working on your skating skills, falling forward when practicing explosive starts only shows that you are making a good effort to improve them.

Robby Glantz is an internationally certified Laura Stamm instructor. He is a power skating coach for the Los Angeles Kings, European champion Malmö, Sweden and the German National Teams. He conducts Power Skating schools for all levels throughout the U.S.

This first appeared in the 01/1995 issue of Hockey Player Magazine®
© Copyright 1991-2011 Hockey Player® and Hockey Player Magazine®

Hockey Defense Drills

December 14, 2010 Defense, Drills, Hockey Blogs No Comments

Hockey Defense DrillsHelper Drill
Here’s a great drill from Sportvideos.com that encourages defensemen to scan the ice before they receive the puck when regrouping in the neutral zone.

In this drill, the defenseman starts on either size of the ice at the center line and skates backwards between two cones at the center ice face-off circle.

The defenseman then looks to both sides of the ice to