If you are a Bantam coach looking to give your players a good skate, challenge them, and also run a few fun hockey drills then you are in luck. I have found a number of great hockey drills put together by the Ontario Minor Hockey Association. These are all available in PDF (download link at bottom of post) but I have also broken them down to be viewed online.
| Drill Time |
Drill Description |
| 8 minute |
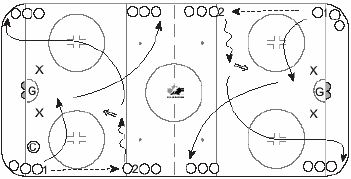
Reverse A-B-C-D Drill |
- O1 skates to centre ice
- O2 leads O1 with timing pass
- O1 Accelerates onto puck, drives around pylon or coach applying pressure to shoot
- O1 continues in front of net to opposite line
- O2 now skates to get pass from O1
To encourage players to chase rebounds and drive net after shooting you can have them continue driving to net and tapping the post with their stick after each shot. |
| Hockey Drill Diagram |
 |
This is a simple overspeed drill that will help the players push their comfort limit and work on their edge control.
| Drill Time |
Drill Description |
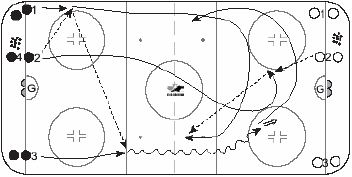
| 6 |
Crossover Snake |
- Crossovers around pylons
- Continuous Crossovers, no forward striding
- Add pucks and repeat the pattern
A good way to challenge the players is to tell them they are not getting pucks until they skate the pylons with proper technique. This means continuous crossovers, no straight lines (all crossovers), controlling the stick around pylons, two hands on stick, lead with head and stick around the pylon, don’t let the stick go over top of the pylon, use both feet in the turn for maximum control (no dragging the feet), etc |
| Hockey Drill Diagram |
 |
This is a good drill to help defense work on slapshots from the point and reinforce forwards to drive the net. Use this drill to teach the forwards to activate their defense. Coaches can apply some pressure in the passing lanes to the slot to show when forwards should be using defense and give the players some pressure when driving the net.
| Drill Time |
Drill Description |
| 6 |
Bantam Goalie Drill – Telescoping |
- O1 Passes to O2
- O2 drags to the middle, taking a slapshot on goal
- O1 moves to the net for a rebound
- After the play, O1 and O2 race to the opposite lines, alternate sides
|
| Hockey Drill Diagram |
 |
This is a fun drill that can be used to work on certain situations. The coach can reinforce coverage in front of the net, battling in corners, puck support, watching the slot, communication between defense, etc
| Drill Time |
Drill Description |
| 7 |
Zone Games |
- Coach spots a puck and calls 2, 3, or 4 players
- Players from each team enter for 45 second game
- Coach whistles to clear the zone; next group is ready to go
|
| Hockey Drill Diagram |
 |
This is a good high intensity drill to work on back checking, break outs and offensive zone entry
| Drill Time |
Drill Description |
| 8 minutes |
Hound back 3 on 0 |
- O1, O2, O3 hound back to defensive zone
- O4, O5, O6 pass to O1, O2, O3
- O1, O2, O3 breakout 3 on 0 with speed and variety
- Variety of team tactics through neutral zone
- Attack G1 using Principles of Attack
|
| Hockey Drill Diagram |
 |
This is basically a shootout with consequences, the consequence is not quite clear in the description, you can make your own.
| Drill Time |
Drill Description |
| 8 |
4 corner Place your bet |
- 1 vs 0
- Scoring team receives a point
- Non scoring team skates over
- Alternate sides for shooting
|
| Hockey Drill Diagram |
 |
This one is a bit complex, but a great drill to work on shooting, skating, and timing the passes. Once the players get it they will move well in this drill
| Drill Time |
Drill Description |
| 8 minutes |
Swing Drill |
- O1 begins the first repetition only, with a shot on goal
- After the shooter releases, retrieve a loose puck from the corner and pass to O2 swinging below the circle
- O2 take 2 or 3 steps and then passes to O3 who swings from mid ice to the outside lane
- Players advance to the next line
|
| Hockey Drill Diagram |
 |
This is a nice drill for offensive zone entry and breakouts. The diagram is not too clear so you will have to use your imagination a bit when thinking up the drill.
| Drill Time |
Drill Description |
| 8 minutes |
3 on 3 / 3 on 1 / 3 on 2 |
- O1, O2, O3 attack 3 on 0
- After play, O’s regroup with pass from O2 and go back 3 on 1 vs ▲1
- After the play O’s regroup with pass from O4 and attack 3 on 2 vs ▲2 and ▲3
- O1, O2, O3 go next
|
| Hockey Drill Diagram |
 |
This is a nice passing and shooting drill for the defense and forwards
| Drill Time |
Drill Description |
| 8 |
1 on 1 Transition |
- ▲1 receives pass from O1
- Drags to middle and shoots
- O1 skates to net for screen or deflection
- Coach spots puck in the neutral zone
- ▲1 retrieves loose puck, passes to O1 for shot on goal
- Alternate sides at start, then both sides together
- Add a 2nd ▲ to play 1 on 1 low and 1 on 1 attack
|
| Hockey Drill Diagram |
 |
I like stations to keep a lot of players active at once. You will need enough coaches to run each station
| Drill Time |
Drill Description |
| 8 |
Powerplay Skills Stations |
- O2 give and go with O1
- O2 Passes to O1, attack net
- 02 executes give and go with 01, 03 passes to 01 for low forward walk out
- △1 drags puck to middle and shoots
- △1 retrieves puck, passes to △2, shoots on net
|
| Hockey Drill Diagram |
 |
This is a simple drill that players like. Each player gets to work on their shot, while the goalie can work on angling.
| Drill Time |
Drill Description |
| 7 minutes |
Goalie drill – 5 shots |
- 01 and 02 execute low walk-outs
- 03 and 04 take slap shots
- 05 executes in tight breakaway
- keep rotating positions
Reinforce hitting the net from the blue line, and quick release from in close |
| Hockey Drill Diagram |
 |
Players like this drill and it will help them be stronger on their feet and use their weight more
| Drill Time |
Drill Description |
| 5 Minutes |
Sumo Agility |
- Without sticks, players battle 1 on 1 in a circle with arms crossed
- A winner is declared when an opponent leaves the circle, falls, or touches the ice with a hand or knee
Teach power stance and contact preparation. Coach should monitor safety, can be done in a tournament format |
| Hockey Drill Diagram |
 |
This is another fun shooting drill with some defensive pressure mixed in.
| Drill Time |
Drill Description |
| 10 Minutes |
1 on 1 from corner with help |
- △1 drags puck to center, shoots on goal
- O1 skates to the corner and retrieves a loose puck
- O1 plays 1 on 1 against △1
- If O1 cannot penetrate to the net, O1 returns puck to the corner and calls for “help”
- O2 joins for 2 on 1 play
|
| Hockey Drill Diagram |
 |
A good high tempo drill for defense and forwards. Forwards can drive the net, or go for the wraparound
| Drill Time |
Drill Description |
| 7 Minutes |
Net Drive 1 on 1 |
- O1 Carries the puck around both pylons and drives to the net
- △1 leaves at the same time and must go between the pylons and then skate backwards
- O1 must drive to the outside
Teach quick feet, crossovers, transition skating and puck protection |
| Hockey Drill Diagram |
 |
This is a great drill for the defense to work on coverage and support in the defensive zone.
| Drill Time |
Drill Description |
| 8 Minutes |
2 on 2 |
- △1, △2 start and return to front of net for each play
- O’s pair up in 3 different locations
- Coach passes to any pair of O’s, attack 2 on 2 vs △’s
- △1 and △2 play all three 2 on 2′s
- G2 plays wrap around and point shots with other players
|
| Hockey Drill Diagram |
 |
I hope you can work some of these drills into your next practice. If you are looking for more drills and coaching resources take a look at my ultimate coaches resource guide.
If you want more than just a few drills I highly recommend the Weiss Tech Hockey drillbook and Systems book. There is a lot of great information in the e-books about systems, and the drillbook has lots of drills to enforce the systems.


