If you’ve been training to improve your shot and are looking to add some new shooting techniques to your arsenal we’ve got a challenge for you! I’ve watched all the top goal scorers in the NHL and looked for any OTHER type of shot. Everyone already practices the wrist shot, the backhand, the slap and snap shot, but if you watch closely you’ll notice a lot of goals are not scored using these perfect shots. That’s what this challenge is all about!
The 30 shots we are challenging you to take are the OTHER types of shots, they are variations like a one hand collect, toe-drag and snipe, the knee drop, the push-out shot, backhand in tight, and so many more!
If you’re just looking for inspiration on new shot styles to try, we have a free pdf that you can print off and use to keep yourself motivated and on track to practice every shot style.
If you’re a visual learner we have 5 videos on our Youtube channel showing the first 5 days.
Want even more training videos?
If you enjoy the teaching and demonstrations in those 5 free videos we have 25 more in our 30 shots in 30 days course.
Part of our mission at How To Hockey is to give back, and help anyone, anywhere play the best game in the world! As every hockey players knows, it’s not cheap to play! We’re hoping to help remove that barrier by donating 100% of our proceeds from all of our merch sales in the month of November to Heros Hockey. Heros hockey is a 100% volunteer run organization that provides hockey programs to underprivileged kids free of charge. All of the ice time and equipment is covered by donations.
We’ve added a lot of new designs that will keep you warm on the pond and in the hockey rinks. To look great, stay warm, and help give back visit our shop and pick up some merch!
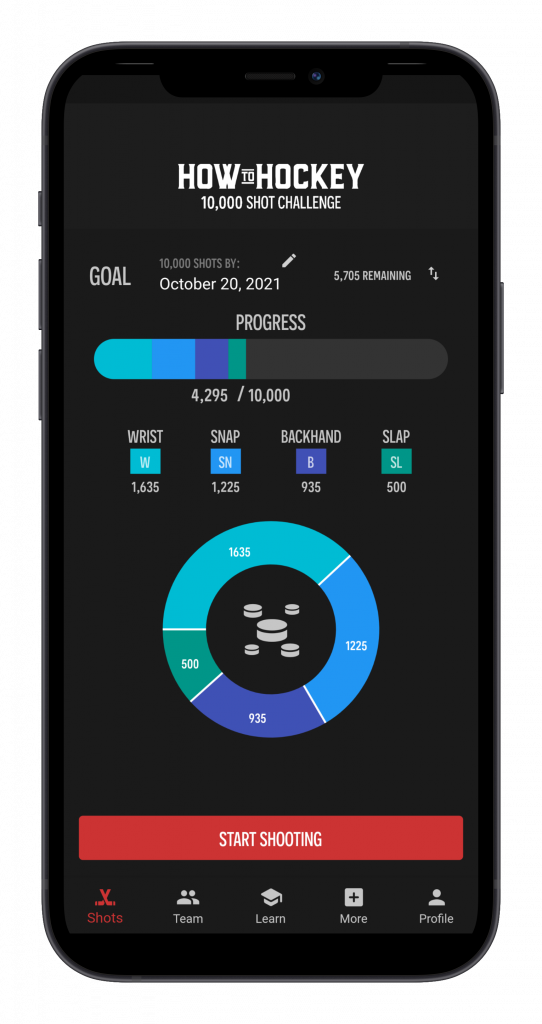
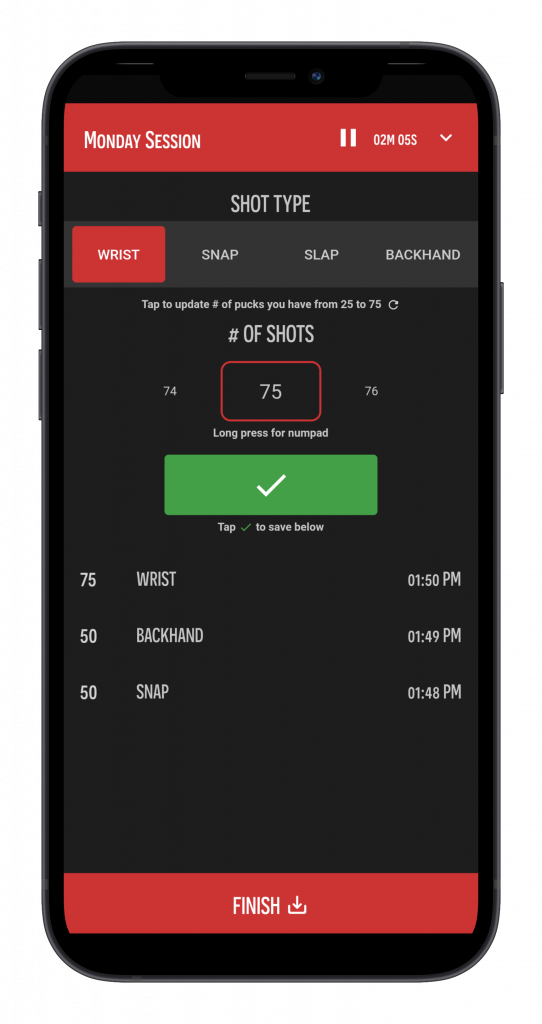
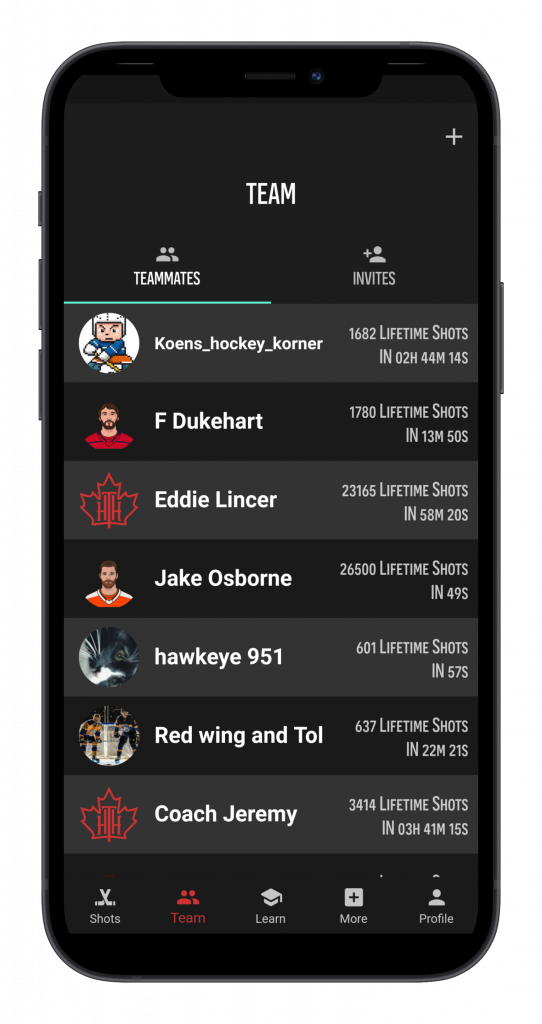
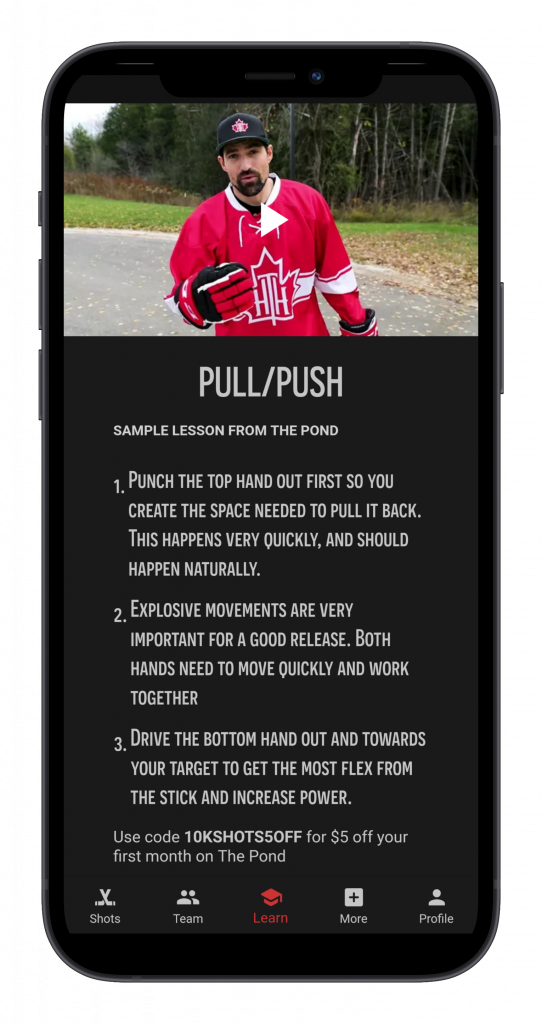
We’re excited to announce the release of our free 10,000 Shots app! You may have heard of the ten thousand shot challenge before but if you haven’t, it’s name pretty much sums it up. Players can improve their shot by regularly practicing (shooting 10,000 pucks) and our app aims to make it simpler than ever to track their progress, learn new shooting skills, and compete with teammates on the road to ten thousand shots.
We wanted to make it easier, more fun, and more motivating for players to track not just how many shots they’ve taken, but how many of each type of shot. We even included some free lessons on shooting right within the “Learn” tab of the app.
To download the 10,000 Shots app click the download button below.
While working on your shot, it’s important to focus on the fundamentals, that way you’ll get the most out of your practice time. Be focused, and put in a good effort and you’ll see big improvements. Here are some tips for your wrist shot
Tips for your snapshot
We have more tips inside the app, it’s 100% free and made to help hockey players improve their skills. There are no ads, and no in-app sales, Haden and I created this to give back to our fans and help anyone, anywhere get better
One of our members over at The Pond was asking about how to reduce soreness after hockey. He’s 61 years old and recently started playing hockey in NEW ZEALAND! We welcome (and teach) players of all ages to play the best game in the world, and we want you to feel good after each game, so here’s a list of ways to reduce soreness and aches after hockey. Oh, and remember it’s Never too late to learn hockey!
Pre-Game Dynamic Stretching / Warm-up
We get it, the only warm-up most beer league players do is running through the parking lot and arena lobby because they showed up 5 minutes before the game was supposed to start. Minor hockey players usually warm-up with their team, or are naturally warmed up by playing before their games. If you feel aches and pains after a hockey game, these dynamic stretches should help, and may also increase your performance on the ice. Start with just a few, and if you like them, add to your routine.
Post-game Static Stretches
After a game your muscles may start to seize up (especially if you’ve been sitting at a desk all day doing nothing) To combat this I recommend static stretches. Below are a few really simple ones, in the video they use a stretching band, but I’ve used a towel, or a pair of jeans and that works just fine. This is a simple 3 minute routine, but you could add more stretches to this if needed. I always feel so relaxed after doing this.
If you need more stretches to add to this look for IT band stretches. Here are a few you can do with a band
Hydration + Nutrients
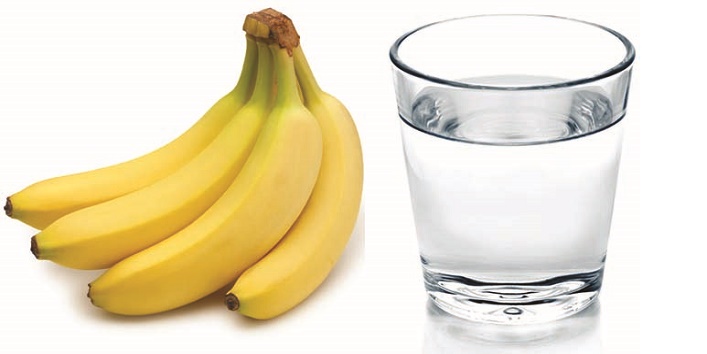
You will need to hydrate before, during, and after a game. Poor hydration can lead to cramping and muscle soreness. On top of this the proper nutrients also help. Chug some water before your game to pre-hydrate. Sip water after each shift, and then get some more water in you when you get home.
I like to also eat healthy foods like vegetables and fruits (bananas really help after a game) to provide more hydration, as well as the nutrients and electrolytes the body needs. Another benefit of eating fruits is the glucose in fruits helps restore the glucose in your muscles that was used during game play (in turn reducing lactic acid build up that causes soreness)
Cool Down / Cold Showers
There is a reason NHL players ride a bike and take an ice bath after games (In fact Marleau takes one between periods!). The bike keeps their muscles moving and helps stop lactic acid from building in their muscles. The ice bath gets blood flowing to the muscles which also helps clear out lactic acid. Most of us don’t have ice baths and exercise bikes at home, but a quick walk and ending your shower with cold water for a few minutes will have a similar effect.
Myofascial Release / Rolling out the Muscles
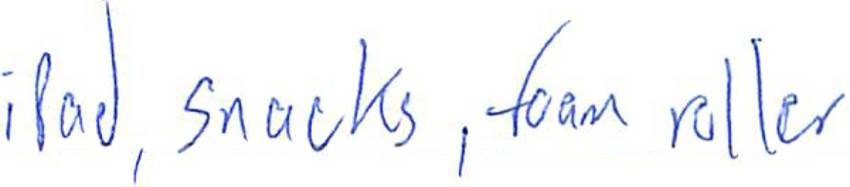
NHL star John Tavares was asked what he always travels with, and his answer was “Ipad, Snacks, Foam Roller” A foam roller is a device a lot of NHL players use to reduce muscle soreness after workouts or games. You are essentially giving yourself a massage using either rubber balls, or foam rollers. Here is a master class in foam rolling
That pretty much wraps up how you can reduce aches after hockey ( also known as DOMS or delayed onset muscle soreness). If you’re just learning to play, or want to improve your hockey skills we’d love to have you join us on The Pond. Our courses will walk you through all the major skills with easy to follow step-by-step instruction.
In today’s video, I’m going to show you how to command more power from your shots. Truth be told, its more than just being strong! This video will show you how to utulize your lower body, how to torque, how to transfer weight, and of course, how to use your arms for power. Let’s dive in.
Isolate the Upper Body
If I was to simply tell you not to use your legs on your next wrist shot, you probably still would. It’s a natural feeling when you want power in your shot to use your legs, but I want to talk about isolating your upper body so that you can see just how much power you’re actually getting from up there. To do this, we’re going to actually remove your legs from the shot. How you ask?
Kneel.
No, seriously, kneel down. You might think I’m crazy, but this way you can see just how much power you’re actually getting from the snap of your wrist. Now, you’ll notice once you’ve taken a couple shots like this, that your power isn’t exactly where you thought it would be. That’s the point! You’re used to using other parts of your body to gain power from a shot, but by isolating your upper body, you can train yourself to always be putting the maximum of upper body strength in every shot, when you’re standing and using the other parts of your body.
If you’re finding that you have next to no power from this stance, then it’s time to work on your shot a little more. I have another video that goes over the building blocks of shooting that you can watch here.
Feel Uncomfortable
I also hope you noticed how weird, and uncomfortable it felt shooting from that kneeling position. When we’re training normally, we set up right where we want to, and we have the perfect conditions for shooting. We’re training ourselves to only be able to shoot in an ideal situation. This helps train your mind to shoot from different angles, which is a benefit, even if you never find yourself shooting from your knees in the slot like Crosby…
If you’re finding it too difficult to do this on two knees, there are a few more ways to isolate the upper body while shooting.
Shoot from one knee
Sit on a chair
Either of these options are sure to give you a very similar feeling to being on your knees.
Many hockey players dream of making it to the NHL, however most of these players do not understand the amount of commitment and discipline it takes to make this dream a reality. I wanted to help players realize what it takes by asking a player who currently plays AAA hockey.
AAA hockey is the highest level of minor hockey. You don’t HAVE to play AAA to make the NHL, but playing at the AAA level certainly does help in development. Below is an article from Patrick Murphy from MurphHockey.com. Patrick is a very passionate hockey player, he balances hockey with other activities, he is focused and also helps out in his community. I think he is a good example for other players to show what it takes to make a AAA hockey team. What it takes to be a AAA hockey player – Written by Patrick Murphy It takes hard work, a positive attitude and total commitment to be a AAA hockey player. Competing at an elite level in hockey is not easy! It takes a total commitment on your part and support from your family too. I have a hockey stick in my hands from morning until night, working on my stick handling and shooting skills, I also sign up for extra skating or skills sessions. Besides team practices, get on the ice as much as possible! Stick time is fun and gives me a chance to work on my moves. Power Skating classes are really important, I would finish an hour of hockey practice, take my helmet off, grab a drink, get a quick snack and hop back on the ice for another hour of power skating class. I was exhausted, but I didn’t mind because it was more ice time. Skating is so important to the game of hockey, so make sure you are a strong skater. Ever since I began playing hockey, my parents have discussed with me the 10,000 hour rule (from the book, The Outliers). Basically, I would need to put in roughly ten thousand hours of practice to be successful in hockey. I used to print out monthly calendars and keep track of my progress, but now I just use an app on my iPhone. It has to be a priority, to put in the time! The most import thing for me is to remain focused on my goals. I set goals each season and work as hard as I can to achieve them. Playing hockey at an elite level of AAA is an honor. It takes dedication to remain there, the end result is worth it.
You can see from the article above that playing high level hockey isn’t about simply trying out and hoping you make the team. It takes dedication and focus. Patrick sets goals, plans out the steps needed to achieve them, and follows through.
The “Datsyukian Deke” is a deke that was made famous by Pavel Datsyuk when he scored an amazing goal on a breakaway and sent the goalie to one side of the net while putting the puck in the other side. Datsyuk performed this feat once again in a shootout and since then a number of other players have scored using this move. In the article below I will break the move down step by step so you can practice and perfect it. Remember that when performing a move there are two critical keys to success. Properly reading the goalie, and properly executing the move. If you do a move perfectly in the wrong situation (not reading the goalie) you probably will not score, likewise if you read the goalie properly but can not pull the move off, you will likely be stopped. The right time to use this move
Most players use this move while they are approaching the goalie on a slight angle, but almost straight on. Ideally you will be hinting / moving towards a shot to your shooting side. If you have the goalie near the middle of the crease and moving a bit to your shooting side you have him where you want him. The approach
Approach the goalie with the puck in front of you, this will cause him to square up with the puck and have him thinking that you will either deke left or right (you can not shoot with the puck directly in front of you) The first fake
As you get closer to the goalie move the puck to your shooting side, this will tell the goalie that you are going to shoot, hopefully he will move more to the side of the net to square up with the puck, if he doesn’t, just shoot the puck, if the goalie does move he’s doing what you want! The second and most important fake
Now you need to fake a shot to your shooting side, far post. You really need to sell this shot, and the goalie needs to react for this move to work. If the goalie does not bite on this move he will be able to react to the next move and possible stop you. The better you can sell this fake shot, the better chance that you will score The drag
Now you need to catch the puck with the back of your blade, pull it back (away from danger) and towards your body. You will also point your leading foot to the other side of the net so that your body and the puck will move to the other side of the net. This is the trickiest part of the deke, so practice it a lot! Shoot
Hopefully you will now have a fairly open net to shoot at. Always shoot for the top shelf! #1 it looks awesome and #2 you never know if the goalie is going to slide his pad or stick across, you’ll be more likely to score if you shoot high.
The slapshot is the most powerful shot in hockey, but also one of the least accurate and usually the most difficult shot to learn. The slapshot has many differences when compared to the other shots in hockey, however some of the fundamentals remain the same. In this article I explain how to take a slapshot in a few easy steps. You can also watch the video for more advice. How the slapshot works The reason the slapshot is so powerful is because it requires a lot of explosive power and also stores a lot of energy in the hockey stick. In order to store that energy in the stick you first must be able to flex the stick. The stick flexes when the blade of the stick hits the ice, and pressure is applied to the shaft of the hockey stick (near the center). This causes the stick to bend, when the stick hits the puck the puck is then launched towards the net as the stick releases it’s potential energy and straightens again. Setting up for the slapshot
In order to prepare for the slapshot the puck should be lined up with the front foot and a few feet away from the body, the exact location varies depending on the player and situation, but a general rule is to aim to strike the puck while it is in line with the front foot. Hand Location
Your top hand will be in it’s normal location, while your bottom hand should move down to at least the halfway point of the shaft. You can have your hand a bit lower than half, however do not go too low. If your hand is to far down you will not be able to flex the stick properly and it will also compromise your body position. Step 1 – the wind up
You want to keep your wind up fairly consistent. Remember to keep the blade of the shaft closed throughout the entire windup and downswing (shown in picture). You want to maintain a closed blade so you will be able to properly flex the stick when you strike the ice. When you begin the wind-up make sure the hands are away from your body, and bring both across your body and up, as if you are going to throw a heavy bag of potatoes. You do not want to bring the stick behind your head or back like some do with a golf club, the stick should basically go straight back and up, and then straight down.
During the wind up you should load up your back leg, the back leg should be bent, which will allow you to push off from the back leg and get more power in the shot.
Practice different heights for your wind up, try a low wind up, and a higher wind up. Sometimes in a game you will need a low wind up to get the shot off faster and other times you can take a bigger windup for a bit more power. Step 2 – the down swing
This is the beginning of the power generation of the shot. This shot should start with a strong drive from your back leg, this will get your weight moving towards the target and add more power. You will simultaneously push with the back leg while driving the stick towards the target, and down towards the puck. Step 3 – Contact
Try to contact the ice a few inches behind the puck, when this happens you should really drive your bottom hand into the stick to flex it as much as you can. Step 4 – Lift off
Immediately after ice contact and driving with the bottom arm you will pull back with the top hand, while pushing with the bottom hand. The blade will contact the puck while this is happening and the puck will be propelled towards the net.
The puck should contact the blade in the middle, to far to the heel or toe will negatively affect the shot. Step 5 – Follow through
Roll your wrists in the follow through for more power and accuracy. Follow through to where you want the puck to go, keep the follow through low and roll the wrists for a low shot, follow through high and keep the blade more open for a high shot.
Slapshot Video Lesson
Embed video http://www.youtube.com/watch?v=ikkFOcBLSsc
Tips for power
A good shot starts with the legs, start with explosive power from the back leg to get proper weight transfer. You can also try getting more power with the rotation of your torso. You may also want to try a lower or higher flex stick. In order to get the most power you should be able to flex the stick quite a bit, if the stick is too stiff and you can not fully flex it you are losing some power. Tips for Accuracy The slapshot is the least accurate shot, so please just try to hit the net. If you aim for the top corner, there is a good chance the puck will go over the net, or to the side of the net, which rarely produces additional scoring chances. If you can at least hit the goalie and force him to react there is a good chance one of your players can get a rebound and score, or at least continue to apply pressure. Don’t try to pick corners with the slapshot unless you have done it consistently in practice.
If there are players in front of the net, keep the shot low. A low shot has a better chance of finding the net, the goalie will be screened, and you are less likely to hurt your own players. Quick Slapshot Tips
Try to keep your backswing simple, this will help your shot be more consistent
Power comes from the legs, arms, stick, weight transfer, and the core rotation. Work on isolating all of these areas during practice so you understand how they all work.
Really drive into the stick with your bottom arm to flex the stick more and get more power from flexing the stick
Look at the net first so you have a basic idea of where to aim
Shoot low when your team mates are in front of the net, that way they can tip it in, or get rebounds
Use the slapshot when you are further from the net and need a hard shot, when you are closer consider a wristshot or snapshot for better aim and a faster release
If you are looking for more shooting tips you can visit the shooting section on the How To Hockey website