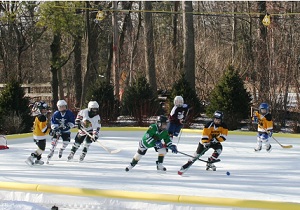
Forms of Dicipline anyone??
Views: 3628 | Replies: 1

GearGeek is the world’s first online NHL equipment database.See what every active NHL player is using on the ice right now – sticks, gloves, pants, skates and helmets. You can sort by brands, teams, positions, stat leaders and more.GearGeek is free to …
Drill:1. Place O in each corner with a puck2. D starts in front of net and skates toward one of the O3. When he stops and transitions, the O drives the net and they play 1 on 1 until a score, puck freeze or D clears the puck4. D then picks another O an…
I’ve been asked a lot over the years what I look for in a player during evaluations. After watching my son during various AA & AAA Ice try-outs, I’ve been thinking more about this topic and wanted to share a bit of what I look for and some ot…
Views: 3628 | Replies: 1
Recently my team was having some trouble consistently creating offense. We have a lot of talented players but they were getting lazy and falling back on old bad habits. Sometimes a coach needs to bring in a new voice to speak to the team about some of the concepts he is trying to teach. Chris Campanale is a local professional player who lives in our area and works out at the facility in our rink. I asked Chris if he would be interested in coming out to practice once a week and working with my team on offensive tactics. Chris was very willing to step up and help the younger players develop their offensive skills.
Chris worked with our players once a week for the past three weeks. In the four games before I invited Chris out to skate with us we scored nine goals and went 2-1-1. In the four games since Chris started working with the players we scored 25 goals and went 3-0-1. Now, that is a major turn around and multiple factors played a roll, but Chris’ fundamental tactics were instrumental in the surge in scoring.
Some of the key points.
Here are some of the drills Chris ran with the team to work on these fundamentals.
In addition to the above drills that Chris worked on here are two others from Coach Cronin former Northeastern University head coach and current assistant in Toronto, that develop similar skills.
Also don’t forget about teaching cycling concepts in the offensive zone. Here is something I put together last season for the progression of cycling drills.
Teaching offense is always a difficult task for a coach. So many factors play a role in a successful offensive attack, but if you work on fundamental skills and tactics the players can begin to incorporate those ideas into their general knowledge and start making better and smarter plays in the offensive zone. The offensive game isn’t black and white, it’s mostly gray and centered around the fundamental idea of read and react. Try working on drills that teach specific parts of offensive zone play and I think you will begin to see an improvement in your teams ability to create offense.
Unfortunately for us Chris leaves this weekend to start training camp with the Bloomington Thunder and won’t be around to continue helping us out. We all wish him the greatest success and look forward to working with him again in the future.
.
![]()

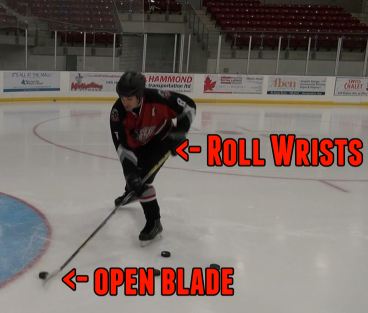
As part 2 of the backhand challenge (be sure to sign up to our newsletter to join our next challenge!) I wanted to teach you how to get more power on your backhand shots. In this post I have a new video for taking backhands from further away, as well as a number of videos from the pro’s unleashing awesome backhands. There are three steps to having a great backhand shot in hockey, I will explain them all in the article and video.
Puck Location – You want to release the puck when it is roughly lined up with your front foot. Using this location as your release point allows you to get your body weight behind the shot, add more power through weight transfer, and build more speed on the puck with the set-up and execution of the shot.
Blade angle – The blade angle when you release the puck is important. I think most people who can not lift their backhand probably do not open their blade enough. If you watch the pro examples below closely you will notice they all open the blade of their stick and then unleash all their power into the shot
Explode – This last tip comes from weight transfer and timing, but also includes the movement of your hands and arms. I notice that most guys with good backhands prep the puck, and then unleash everything they’ve got on it. It doesn’t seem like too many guys do a long sweeping backhand shot, it’s almost more like a backhand snapshot. Watch my example above and the pro examples below to see what I mean
Crosby pops the water bottle
Here is a game situation backhand from Crosby. Notice at the 33 second mark he has the puck cupped to control it’s location. He has the puck lined up with his front foot, and then in the next frame he opens the blade and lets it rip. Also notice after the shot his back leg is extended, which is a result of pushing with the back leg to get more power on his shot
Datsyuk Backhand
This is a good example of turning the feet first, and then letting the backhand go. Turning the feet also allows you to get more torque on the shot. With your feet turned more towards the net you can rotate your body more into the shot and get more power, watch the magician himself
Here is a near identical goal, notice how he cuts towards the net while he’s shooting. This helps get more energy moving towards the net for a harder shot.
Zetterberg Backhand
This is an amazing snipe by Zetterberg! Check the 22 second mark of this video to see his position. The puck is forward in his stance and he has the blade opened up. He is also leaning in towards the net, next he does a nice snap motion to put the puck in an almost impossible opening.
Take the tips from this article and my video as well as the tips from my roofing the backhand video and article and start shooting!

Last year I caught wind of the Easton Mako and heard that it was going to break a lot of new ground when it came to hockey skates. Easton was working with a former speed skater-turned-hockey-skating-coach to design a new “faster” skate. In fact he started his own skate company and Easton bought it to utilize his designs and technology. I thought the idea sounded interesting and was excited to see the new skate. That new skate is the Easton Mako and it has gotten a lot of attention lately. I requested a pair to review and Easton was kind enough to lend me a pair.
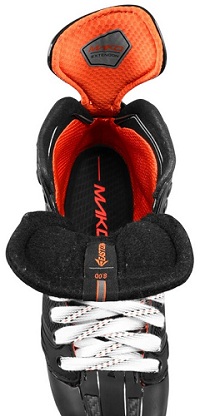
The first thing I noticed when I put the skates on was how comfortable they were. I didn’t try them on before I got them or have them baked to my feet. I just let Easton know my size and then got a pair of skates to try. I can’t even imagine how great they would feet if I actually had them baked and fitted properly. I go into more details on the fit and feel of the Easton Mako skates in the video below
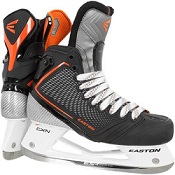 Yes, but not to everyone. I love the skates, they feel great, they are light and they give me that natural skating feeling that I love.
I would recommend the skates to anyone who is looking for a high quality skate that will last, knows what they want from a skate, and can afford the steep price tag.
I would not recommend the skates to anyone on a budget or newer hockey players who are not sure what style, fit, and skate features they like.
I won’t copy and paste all the specs here (you can find them on the Hockey Monkey Mako Page) but I found this video that covers them nicely (who want’s to read all the stuff anyways!)
I thought that the story of how the skates were created was pretty interesting. Dave Cruikshank was a former Olympic speed skater that was obsessed with tinkering with his skates, and when he retired he was hired by an NHL team to teach their players. The problem was a lot of the drills didn’t feel right in his skates, so he created his own hockey skates.
 For the price you pay you expect great skates, and that’s what you get. The skates are everything you look for, they are light weight, comfortable, and provide the speed and agility a player needs.
The most noticeable features for me were
If you would like to get a pair check out the link at the top of the article, or if you are in the market for a cheaper skate you can always check out the bargain seection
We are on day 2 of the backhand challenge to shoot 1000 backhands in one week (if you want to know about future challenges be sure to sign up to our newsletter and Facebook page). After one day of shooting on your own I wanted to deliver some fresh tips for shelfing the puck when you are in close. In this post and video I explain the simple three step process to going top cheese!
 This method is best used while in close to the net
Thanks for watching. If you want more tips you can subscribe to our website below. We also have buttons below to share this page ![]()
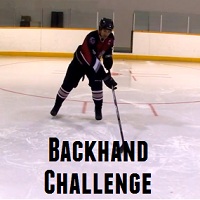
I thought it would be fun to do a quick challenge to help motivate hockey players (YOU!) to improve their backhands. In my opinion the backhand shot is the most neglected in hockey, almost every player I work with wants help with their slapshot. If you ask me the two most important shots for forwards are the snapshot and the backhand.
The challenge is running from Wednesday October 2nd to Wednesday October 9th (join our Newsletter and Facebook page to be notified of new challenges). In that span of time you are challenged to take 1000 backhand shots.
Do I NEED to take 1000 shots? – No, you don’t have to, you could shoot more or less, but I encourage hitting the 1000 mark. The point is that you TRY to reach 1000 (about 142 shots per day) If you have 25 pucks you will need to shoot all of them 6 times each day.
Are there prizes? – Yes, everyone who enters (whether you get to 1000 or not) will be entered to win a free shooting analysis, my stickhandling guide, or access to my Goalie Buster training videos. I will randomly choose winners and the winners can pick which prize they would like. And of course everyone who enters wins…..a better backhand shot!
How do I enter?
Is that goal regulation size or what!? Don’t worry, the backhand is a tough shot, but I am here to help.
I will be posting two videos on my Youtube Channel to help with your backhand, so stay tuned to our Facebook page and Youtube. One video will show a neat trick for popping the puck up quickly, this will make you dangerous when in close. The other trick is to get more power from a distance.
Thanks for reading and sharing, I hope to have a lot of players participate and work on their shots.
Views: 4221 | Replies: 1
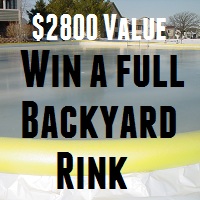
Jim from NiceRink.com contacted me recently and asked if I would like to host a contest on my site for the readers of How To Hockey, with the prize being a full backyard rink kit valued at $2800! Well, I think you know what my answer was. I am very happy to announce that one of the readers of this site could be skating on a 32 x 60 backyard hockey arena this winter for free.
 Everything you need (except the water) for a 32 x 60 outdoor hockey rink
The more times you enter the better chance you have of winning!
a Rafflecopter giveaway
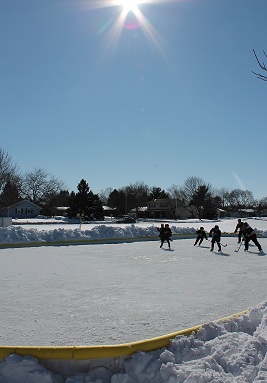
Last year I published a very popular article on how to build a backyard rink, we also have an article with the top 10 questions when building a rink. If you are not very handy with building and you want a professional looking backyard rink that you can use every winter (with exception to replacing the liner every few years) then a NiceRink package will be perfect for you. If you are a “handy” type person, then NiceRink offers any component individually to help make your rink project easier. A NiceRink gold package includes everything you need to set up the perfect rink, all you need to do is set it up, and then fill it with water. The flatter your yard is the less water you will need.
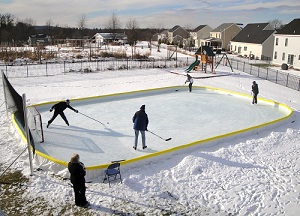 NiceRink can help you create endless Frozen Memories for your family. You want a nice looking backyard rink that is easy to assemble. NiceRink helps take a lot of the work out of assembling a rink by providing you with the four key components; NiceRink FULLY INTEGRATED side support Brackets, Thermoformed Boards, NiceRink Liners and the NiceIce Resurfacer. Whether you start small with a 20′ x 40′ kit and expand as you go, or jump in with both skates on a 44′ x 88′ Gold Package, NiceRink offers the most unique “personalized” self-leveling rink system, that actually works virtually anywhere. The NiceRink choices are infinite, the possibilities are limitless, and our product reputation is second to none. Start your own story today, let NiceRink help you create Frozen Memories of your own this winter.
Visit/Contact Us at:
www.nicerink.com
www.facebook.com/nicerink
www.pinterest.com/nicerink
I picked this drill up watching former NHL player Tony Horacek running a practice with his team last week. I ran it with my team last night and really liked it. The drill takes a minute for everyone to understand their role but once it gets going it really has the players working to make good passes and understanding the underneath route to making headman passes. I’ve created a quick video to explain the drill just in case the document isn’t clear enough.
Make sure you have the player looping back into the zone make a good hockey stop and quick transition. I told my guys to act like there was a turnover in the neutral zone and they had to quickly get back to defensive positions. Hope you like this drill as much as I do.
Horacek Underneath Passing Drill
![]()
These drills work on some of the fundamental puck handling skills a goaltender needs to be able to master. It is extremely important to have a goaltender that can handle the puck, especially at the older age groups.
These drills can be used while working with the defensemen so that both the goaltender and defensemen can work on these fundamental skills.
.
![]()
