IHD Newsletter – June 2013
This month’s newsletter has been sent. You can read the June 2013 Newsletter here.
Related articles:
Newsletter sign-up
Past Newsletters

This month’s newsletter has been sent. You can read the June 2013 Newsletter here.
Related articles:
Newsletter sign-up
Past Newsletters
Once again, I watched an NHL game and found 2 common mistakes that I constantly remind my players of during practice and games.
Watch the video below and then I’ll dissect it further. Make sure you watch at :03-:05 seconds and see if you find the 2 mistakes (make it 3 if you count the Goalie, watch at :43 seconds on to see it):
In this play, I see 2 glaring mistakes that result in a bad goal.
How I’m teaching this play to my players, I strongly feel the Defenseman (#2) can’t jump this play and call for the puck.
The second issue I have is Crosby’s play on this puck.
The Penguins played rushed all game. Trying to get rid of pucks as fast as they got a hold of them. Sloppy passes, sloppy turnovers resulted in a lot of bad goals.
The last mistake I see on this play is the Goalie. If you watch the angle from behind the net (~:43 seconds) Vokoun starts cheating back to the middle and leaves the glove side exposed. I’m not a goalie and maybe this is the correct play but I have to think he needs to protect that side.
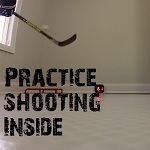
A big problem for a lot of people who want to practice their shot is they do not have the space. In order to work on your shot at home you typically need a hockey net, and a big enough area to practice shooting from a distance. These obstacles usually keep people from practicing their shot at home. Even if you do have the space to shoot at home, you may not shoot as much as you like because of bad weather, night fall, or other reasons. Luckily I have found a solution
In the video below I share a trick that will let you improve your shot in the comfort of your own home. The important part is using the right technique, and knowing what you want to improve.

 I have just released the iSnipe app which will help you track how many shots you have taken. The app also has 16 video tips from me, a buzzer beater training tool, and a quick release training tool. For details visit my iSnipe page, or you can buy it in the app store.
I constantly work with my players on two key areas of their game. They are so critical and can truly be the difference between winning and losing. Last night, we saw it in Gm7 of the Hawks-Wings series. Earlier in the game, I made the comment that when you watch the Red Wings play, it always seems like there are 6 skaters on the rink. They are fast, they are aggressive and they are on loose pucks ALL the time.
One little breakdown in that mentality and it can send you packing. Watch the first 15 seconds of this video and then I’ll explain.
There are two glaring failures on this play (forget about the fact if you think the hit was a penalty or not).
The defenseman gives way too much room here. Both are looking at the puck carrier but there is no pressure. You need to get a stick out in front and close that gap. If you do, there is no shot on net. The inside defenseman has to be aware his partner is right there and he should step up. Even if he gets beat, he’s got help.
Secondly and worst of all in my opinion (especially for OT during game 7) is the lackluster backcheck. You can’t skate and watch a player carrier the puck into your zone. #11 almost catches him and even ‘taps’ him with a stick. An extra push or two with the skates and he catches him and pops his stick. I don’t care what level you are playing at, lazy backchecking should get you a ‘talking’ to from your coach.
As a coach, these are two areas that we work on constantly. Closing the gap and backchecking. They are huge factors in the outcome of the game.
Former NHL player Tony Horacek coaches in our organization and I went out to watch his practice the other night. While watching a really up tempo session I saw his team run this drill and thought it was really excellent and worked on a number of areas of the game. I spoke with Tony about it and got the details and am sharing it with all of you. It is a multi-part drill so I did my best to make it understandable in the diagram, but if you have any trouble I also did a YouTube video explanation. Hope you like it.

![]()
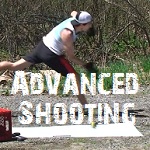
If you browse the how to hockey website enough you will find that the fundamentals of every shot have been covered in detail, most of you who have been following how to hockey for a while should have a good grasp on each shot, so now it is time to take your shot to the next level.
In the video below I share three off ice training methods that you can use to improve your shot on the ice. These training tips will help you with game-like shooting situations. I mostly focus on the quick release and accuracy as these are very important in the game
In this video


In this post we’re dissecting Pavel Datsyuk’s end-to-end goal against Nashville. As great as the individual effort was, there are quite a few team details that really made this play possible.
 It starts with Datsyuk providing proper support for his defenseman in the defensive zone. He picks up the puck and initiates the breakout to the right winger. After making the breakout pass, he follows up the play, providing mid-lane support on the breakout. As the breakout is happening, the weak-side winger blows out of the zone, pushing the opposing defenseman back, which opens up space for Datsyuk to wheel. The play finishes with the opposing defenseman reaching for the puck, and Datsyuk eats him alive.
Great individual effort, made possible by well-structured positional play.
Hope this helps!

I am very happy to announce that the iSnipe app is now available ![]()
 Shot Counter
The shot counter allows you to input and keep track of the number of shots you have taken per shooting session.
You can keep track of each type of shot, while the grand total of shots is shown at the top of the screen.
![image[1]](http://howtohockey.com/wp-content/uploads/2013/05/image1.png?268591)
Each type of shot is explained in detail in the first video detailing the fundamentals of the shot, and how to perform it.
The next three videos explain advanced shooting methods, giving you new ways to shoot the puck.
The longer videos are hosted online, while shorter videos are built into the app.
![image[2]](http://howtohockey.com/wp-content/uploads/2013/05/image2.png?268591)
Videos are shot on the ice so you can see how the movements will translate to game situations
All lesson, teaching tips, and movements can and SHOULD be recreated in your off-ice shooting practice
The videos go beyond the basics, teaching you variations of each shot, how to practice them, and when the best time to use them is
16 training videos in total!
![image[3]](http://howtohockey.com/wp-content/uploads/2013/05/image3.png?268591) Training Tools – The Buzzer Beater
Training Tools – The Buzzer BeaterInput how many seconds you want to shoot for. The buzzer beater has a 3 second delay before it starts, allowing you to set up your first shot.
See how many shots you can take in a given time, how many times you hit the net, how many targets you hit, etc.
Vary distance, shot type and shot angle to continue to improve your release and accuracy in many different situations
![image[4]](http://howtohockey.com/wp-content/uploads/2013/05/image4.png?268591)
Input the amount of pucks you want to shoot, and how many seconds you want between shots. Shot locations are called out instructing you where to shoot.
![image[5]](http://howtohockey.com/wp-content/uploads/2013/05/image5.png?268591)
A notepad area is included to keep track of your goals and achievements. This is handy to have so you can track your improvements in accuracy, quick release, and shot power (if you have a radar gun)
You can also share the amount of shots you have taken easily with Facebook and Twitter.
Views: 4995 | Replies: 1
