Warrior Projekt Shoulder Pads
Patrick Perrett takes a look at the newer model of the Projekt Shoulder pads from Warrior.

Patrick Perrett takes a look at the newer model of the Projekt Shoulder pads from Warrior.
Patrick Perrett takes a look at the newer model of the Projekt Shin pads from Warrior.
Patrick Perrett takes a look at the newer model of the Projekt Elbow pads from Warrior.
The other day I came home to a box on the porch. It was square. It was wrapped. And I think it was glowing from the inside. I hoped it would be from Easton. I had started to see YouTube clips of the skates and really wanted to check these skates out. I’ve been using the same pair of Micron ice skates for over ten years. They’ve been very reliable, but I’ve been looking out for a new pair of skates for a while.
I removed the skates from the box and put them on. Wow, they are sure comfortable. The design is intriguing. At first, the space between the Elite runners design throws you off, but after staring into its eyes for a while, I’m excited to see how they go. The other aspects of the design are around to make your skate stay light through a heavy practice or game. That excess heat should leave through the dry flow area, below the foot. Overall the design has much more to offer than your typical ice skate.
Very soon I will be taking these skates out, videoing my discoveries. After taking a look at the EQ50 skate by Easton, what are some of the questions you have about the skate? With a hefty price tag, the EQ50 isn’t going to be a first choice for someone just starting out, but the price for hockey gear usually correlates directly with how long it will last. Skates can last for a playing lifetime.
Come back to HockeyPlayer.com to see videos on the EQ50 skates, find answers to your questions and followup reviews on the skates along with other products.
By Hockey Player Staff
Oct 29, 2001, 19:25
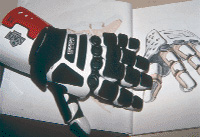 |
| Design by Hoon Chun. |
What will hockey equipment be like in the next decade?
To find the answer, we turned to the creative minds at Pasadena’s world famous Art Center College of Design. Art Center graduates have been responsible for designing such cultural icons as the Apple Computer logo, the Mazda Miata, and numerous cuddly little Muppets—among other things—so we figured they’d have an interesting take on puck in the year 2000.
The mission for students of Product Design instructor Gaylord Eckles was to design hockey equipment that was both functional and aesthetically striking. He wanted gear that dared to inject a little personality into the game’s hardware; gear that was “as dynamic as the sport of hockey itself.”
With the assistance of professional advisor and former NHL defenseman Rick Chartraw, the students analyzed current equipment and found some problems to overcome; high weight, bulk, and limited flexibility in some cases, insufficient protection in others. Then they went to work on the future of hockey.
Here’s a sample of what they came up with.
— Alex Carswell
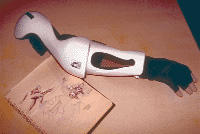 |
| Design by Gregg Luconi. |
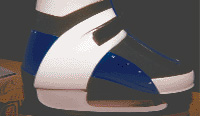 |
| Design by Jason Hurst. |
 |
| Design by Tom Jung. |
 |
| Design by Nam Cho. |
 |
| Design by John Frye and Minho Joo. |
This first appeared in the 05/1995 issue of Hockey Player Magazine®
© Copyright 1991-2011 Hockey Player® and Hockey Player Magazine®
Here is another look at the Tuff-N-Lite hockey sock. After using it for a few months, Patrick recommends the sock to anyone looking for a comfortable sock that also protects your legs.
Here is our review of the Cascade M11 helmet. Currently Andy McDonald, of the St. Louis Blues, is using the helmet. Andy, like many others, has been using the helmet as he recovers from a chain of concussions.
By Paul Chapey
 |
| Paul Chapey |
John Black coached the RHI Portland Rage to a second- place finish last year, but is moving on to coach the Sac-ramento River Rats. That means he’ll be going from the second-best team in the league to the second-worst. Last season he had to teach all his recruits from the ice hockey minor leagues how to in-line skate, so I asked him about the many aspects of converting from ice skates to in-lines.
“I’ve found that professional ice hockey players make the conversion in approximately 4-to-10 days, depending upon their own athletic ability and skating level. Remember, they’re getting paid to train. There’s tremendous motivation to learn and make the cut.
“The pros are focused on skating before trying to play.”
The pros, unlike many amateurs, are also learning on the right equipment.
“Most of them want the same boot they’re using in ice. That’s why the top pros and amateurs aren’t using off the shelf, marketed for in-line skates. They want the best boots and I also think they want an ice hockey look and not some weird design that someone thinks represents roller hockey.
“Most pros are comfortable with stuff that looks and feels like ice hockey (gear), and doesn’t have some graphic designer’s roller hockey touch to it.”
How about wheels?
“I find that it’s very important to learn on the right wheel. Initially, you should sacrifice speed for grip so you can feel comfortable on your edges. You’re used to digging into the ice, and on in-lines you’re not digging into anything and you have a tendency to slide a little bit when you put the same amount of pressure on in-line skates. So with a tighter or grippier wheel you get your edging and strides a little quicker.
“When you get into stopping and more advanced techniques, then you want to get a wheel that has a tendency to give just before stopping.”
I remember the first full season in RHI (1993) when most of the pros were wearing an open grill design aluminum plate that had a very wide wheel base. Did that affect learning because a different stride was necessary?
“That frame was like a cross country skiing effect. The good ice hockey players couldn’t duplicate their same strides because the wheel base was too long.
“The chassis should be mounted back far enough so that the front wheel is underneath the boot. The test is simply run the boot and chassis against a wall. If the boot hits first, it’s right. If the equipment is right, you can learn the edging and strides quickly. What takes time is stopping, and playing under game conditions where you’re darting left, darting right, quick spins and getting bumped in the process, especially in a full-check game like RHI. There’s no substitute for repetitious skating drills.
“They’re gonna fall and fall and then gradually get it.”
Necessary adjustments
What about any adjustments on wheel placement?
“The back three wheels can be 76 mm and the front 72. Or go with 72 and rocker the front wheel. This helps duplicate the feeling of skating on an ice blade because you actually skate on just a few inches of ice blade.”
If all these components are right, do you feel a good ice hockey skater can change over wholesale and not have to change stride?
“Yeah, but it only takes part of the formula to be out of place to warrant a different stride and therefore a more difficult learning process.
And then there are the tools.
“You’ve got to carry allen wrenches, a plate wrench, extra wheels, extra bearings, quick-change tools, wheel cleaner, lubricant, a whole bunch of accessories. Pros have equipment managers, but amateur players better have all this stuff or they’ll find themselves sitting during a game because of a skate problem.”
Does the skating surface affect the learning process?
“I’ve found that most players don’t like to learn on a real tight surface. But it’s after they become good skaters that they appreciate a good skating surface. My players last year liked Sport Court at the Portland Memorial Coliseum when they were learning. But as time went by and they became very proficient skaters and could do everything at will and play the game without thinking, they grew to dislike Sport Court and liked our practice facility and arenas with a roll-on type coating.
“They loved the Vancouver Aggrodome, which was roll-on. On roll-on surfaces they were able to hit greater speed and deeper edges, accelerate and stop and really come close to the action of a blade on ice. They could use narrower wheels that are more blade like and stop on a dime. You can’t stop on Sport Court, you have to sort of side slide.”
This first appeared in the 04/1995 issue of Hockey Player Magazine®
© Copyright 1991-2011 Hockey Player® and Hockey Player Magazine®
By Bill Ferguson
 |
| Yuck! Falling foam liner. |
Picture this. The Madison Square Garden crowd goes crazy as the singer belts out the last line of the Star Spangled Banner. Wayne Gretzky skates to center ice for the opening faceoff of the 94/95 Stanley Cup finals against his old buddy, Mark Messier. Just before the ref drops the puck, Gretzky notices his right skate lace is broken and getting looser with each heartbeat. What does he do?
A. Call time out.
B. Get another center to take the draw.
C. Tell the ref to hold that thought.
D. None of the above.
The correct answer, of course, is “none of the above.” Why? Because odds are this would never happen. This is a pro player we’re talking about, and as part of his pre-game routine he already checked his laces.
I know what you’re thinking. It happened to Tonya Harding, didn’t it?
Well, that’s different. That’s figure skating, and this is hockey!
If your game in the local league is as important to you as the Cup finals are to Gretzky, or the Olympics were to Tonya, then you need to get serious about your equipment. Everyone talks about being mentally and physically ready once you’re on the ice, but what about the hardware? How can you make sure your equipment is also game-ready, head to toe?
Just read on, my friends.
Heads first
We’ll start at the top. Regardless of what you young studs think, the helmet is your most important piece of protective gear. It should be thoroughly inspected regularly, as well as any time it sustains any significant impact. Look for any cracks; no matter how minor they may appear they can allow serious injury to occur, and will certainly invalidate the manufacturer’s warranty. Replace a damaged helmet at once. Also check all screws; replace any that may be corroded, and tighten the others.
Something else to look for is the gradual hardening of the protective foam liner, which is caused by sweat and heat. One thing that will lengthen the life of your foam equipment is keeping it away from heat. In other words, avoid leaving gear in your car during the heat of summer, Einstein, and don’t dry it on the radiator in winter. And remember, this applies to all your equipment, not just helmets: hockey gear doesn’t dry in a bag—it rots.
But back to the hat: once the liner becomes hard, the protective capabilities of the helmet are diminished, so from time to time take the plunge and get a new lid! If the foam is still pliable yet separated from the plastic, the only glues that will work are hot glue, or weather strip adhesive. These may also invalidate your warranty, so check with the manufacturer.
It will also be necessary to replace the plastic and metal snaps on your chin straps. Likewise, the hardware for cages and visors.
Larry Bruyere, co-owner of LA’s All Star Hockey & Sport, says maintenance is a high priority with his patrons. “On a Saturday we will have one guy doing nothing but helmet maintenance all day long. Also, I discourage some parents from buying a top of the line visor/cage combo unless the kid is responsible enough to keep the helmet in a bag or shirt every time he puts it (away). Everything in your bag,” says Bruyere, “whether it’s metal or plastic, will scratch your visor, so a little prevention will go a long way.”
Whatever you do, don’t belittle the importance of your most important piece of protective gear: either do your maintenance or replace your toque.
Below the neck
Shoulder pads shouldn’t require maintenance, as such, yet should be checked occasionally for damage. The experts at All Star Hockey stress a proper fit as being most important for shoulder pads. It is often better to buy a less expensive model which fits properly (no excess space between the shoulder and the pad), as opposed to buying a more expensive model which restricts movement be-cause it’s too large or too small.
The same holds true for elbow pads. No matter how good your elbow pads feel, they won’t protect you if they end up in your glove. Buy only pads which feel good and are snug enough to stay put. Many manufacturers are going to the old Jofa-type design that features a big elbow cap which protects well and stays in place. If you find yourself constantly sliding your elbow pads back into place, get some new ones that fit, or get some new elastic and Velcro sewn on.
And now, the mitts. The most common maintenance problem with gloves comes from wear and tear. If you buy the best gloves you can afford, they will last longer and protect better. (Players with cheap gloves get their hands broken, by falling and from slashes). But when the time comes for maintenance, the better gloves can usually be repalmed for around $60. If they need the gussets between the fingers, too, figure $75. This will double the life of your gloves. If you have cheap gloves with no palms left, the best maintenance I can suggest is to give them to the dog and get yourself some new ones. Day-to-day, protective “leather dressing” is not recommended for hockey glove palms. Instead, just make sure you dry the gloves well between games.
Parents, never buy over-sized gloves for kids. Your child won’t have as good a grip as he should on his stick, and he will blow out the side of his palm—so the money you save by “buying for growth” is wasted by premature equipment failure.
No, not Stanley
Le cup. And, no, I don’t mean Stanley. It should be comfortable. If you have trouble with chaffing, try the new “banana style” cups, which are more slender. Above all, your cup, long johns, and any other piece of clothing which touches your skin should be washed regularly. This may come as a shock to even experienced players but yes, you can wash most of your hockey gear. Gather up everything but your skates, helmet and gloves and put them into a tub of warm water and Woolite once a year. This will not only keep them from smelling, it also helps disinfect. There is a bacteria which can form in wet hockey gear which causes a condition called “The Gunk.”
Don’t laugh—it has ended the career of pro players and can be rather painful, causing red blotches all over the body. The best way to avoid this is to take your gear out of your bag and let it air dry after every game. That’s right, your bag is not for storing your gear unless it is thoroughly dry. Get in the habit of doing this and your gear will not only smell better, it will also last longer. Your teammates and family will love you for it.
Maintenance for your hockey pants is pretty simple; an occasional washing, and quick repair of any small tears. I say “quick” because a small tear, without some attention, will soon become a big hole. Here’s where that old hockey saying—”A stitch in time saves thine… pants”—comes from. All right, so maybe it’s a new saying, but it still applies.
The only other thing to remember about pants has to do with buying them. While padding is critical, and something to be looked for, it is possible to overdo it. Pants with too much padding can sometimes restrict your movement, so it might be better to go for pants that offer a tad less protection with a little more freedom of movement.
If the helmet is the most important piece of protective gear, the shin guards are the second most important. According to the experts, many people buy shin guards that are simply too big—and that’s easy to do if you try them on without wearing the rest of your gear. They may feel great in the shop, but if they don’t work well in conjunction with your skates and pants they will hurt your game. Also, look for shin guards that have what’s called a “sling,” the piece of material that suspends the pad away from your leg, and offers the best impact protection.
The only other care required for shin guards is to check them regularly for cracks. Many players have sustained serious injuries, some career threatening, by trying to “milk” one more game or Practice out of their old cracked pads. Don’t risk it. You’ll play more confidently and aggressively with new pads. One thing I must mention about shin guards is that they should only be taped below the knee—never from the knee up. Taping above the knee can easily restrict the flow of blood to the feet. If you tape high-up, and get “lead feet” halfway through the game, try taping your pads to no more than a couple of inches below the knee.
Who said that?
When it comes to skates, we will start off by dispelling a myth. Pro’s don’t change their laces every game. But, according to Dave Taylor, veteran of 17 NHL seasons with the LA Kings, they do check them before every skate. “And if there’s any fraying at all,” says Taylor, “they will change them.” And always lace your skates the so-called Canadian way—which means lacing over the top, from the outside in. This allows the lace to bind down on itself at each set of eyelets, which not only makes it easier to get your skates tight, but keeps the laces in place.
There is no other piece of equipment you wear that affects your game more than your skates, so they deserve regular attention. First, check the blade and make sure it is tight in the blade holder. With the advent of the new lightweight blade holders came some new problems. If you have an older skate that has a loose blade, you must pull all the rivets, tighten the screws inside the holder and re-rivet it back on. Some of the new Bauers have caps inside the boot that allow easy access to the screws inside the holder. Pro trainers love this feature because it allows them to tighten, and even change, a blade during a game. While you’re at it, check for the obvious nicks and dings that slow you down.
I always “stone” my skates prior to each game to remove small nicks, but if they’re very noticeable, get a sharpening. Generally speaking, the more experienced the skater, the less of a hollow you want on your blade, Defensemen usually want their rocker more to the back of the blade and, of course, forwards normally want their skates rockered more toward the toes—to shift their center of gravity further up on the blade.
Inspect your boots regularly for damage. The first thing that will go on a skate is the inner liner. If your liners are cracked badly enough to cause irritation, cut loose with your check book and get some new ones. Also, check for loss of stability at the ankle. If your skates have lost their support there you won’t skate well, so they need replacing.
These maintenance steps are designed to maximize both your investment in hockey gear, and your enjoyment of the game itself through improved performance. Few things in life are more fun than doing better—better than your last time out, and better than the next guy. Remember, “He who dies with the most goals wins!”
Bill Ferguson has been playing and coaching hockey for over 20 years.
This first appeared in the 02/1995 issue of Hockey Player Magazine®
© Copyright 1991-2011 Hockey Player® and Hockey Player Magazine®
